Setting up ECS with Terraform
This document describes, for the AWS ECS noob, how to set up an AWS ECS cluster from scratch, entirely using Terraform.
If you’re in a hurry, skip to the end to just get a module you can copy-and-paste.
Terraform is a tool that lets you declaratively describe the state of your infrastructure. Probably the best feature about it is that your infra’s state is in version control, instead of ad-hoc scripts and here-be-dragons resources that somebody made by clicking around in the AWS UI.
The big downside, however, is that a lot of things in AWS aren’t obvious to set up with Terraform. This document is a tutorial for one of the tougher things to figure out: starting a new AWS Elastic Container Service (“ECS”) cluster, ready to start running services and tasks.
I’ll assume you have already set up a working AWS provider for
Terraform, and that you know how to issue terraform commands. I will not
assume that you know exactly how ECS works. There will be helpful diagrams.
There will be many AWS-related acronyms, and I usually won’t presume you know
what they mean.
Creating the cluster
Throughout this demo, we’re going to create a cluster called “megapool”.
Actually creating the cluster is actually pretty easy:
resource "aws_ecs_cluster" "megapool" {
  name = "megapool"
}
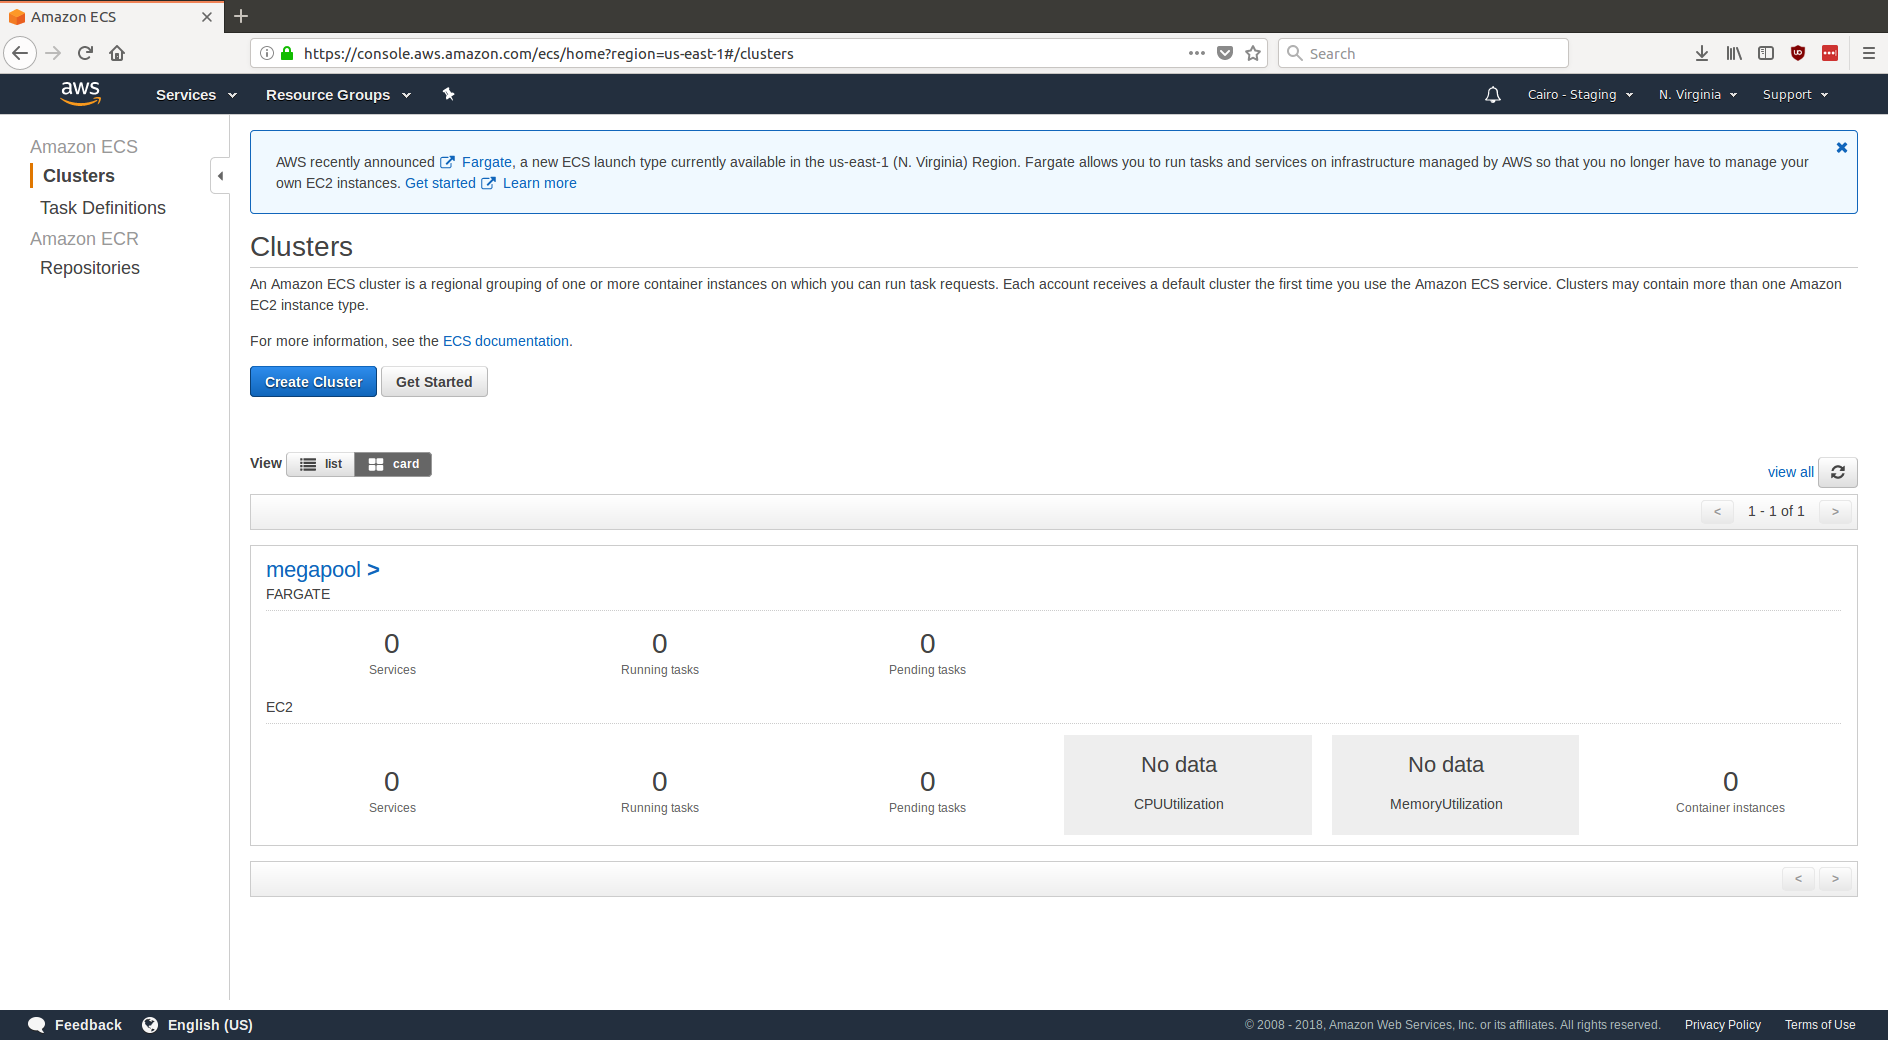
Boom! The cluster is already there:
Adding instances to the cluster
There isn’t much to this cluster yet. You could already at this point add ECS tasks or services to this cluster, but you can’t actually run anything in this cluster yet. That’s because you need to add EC2 instances to this cluster.
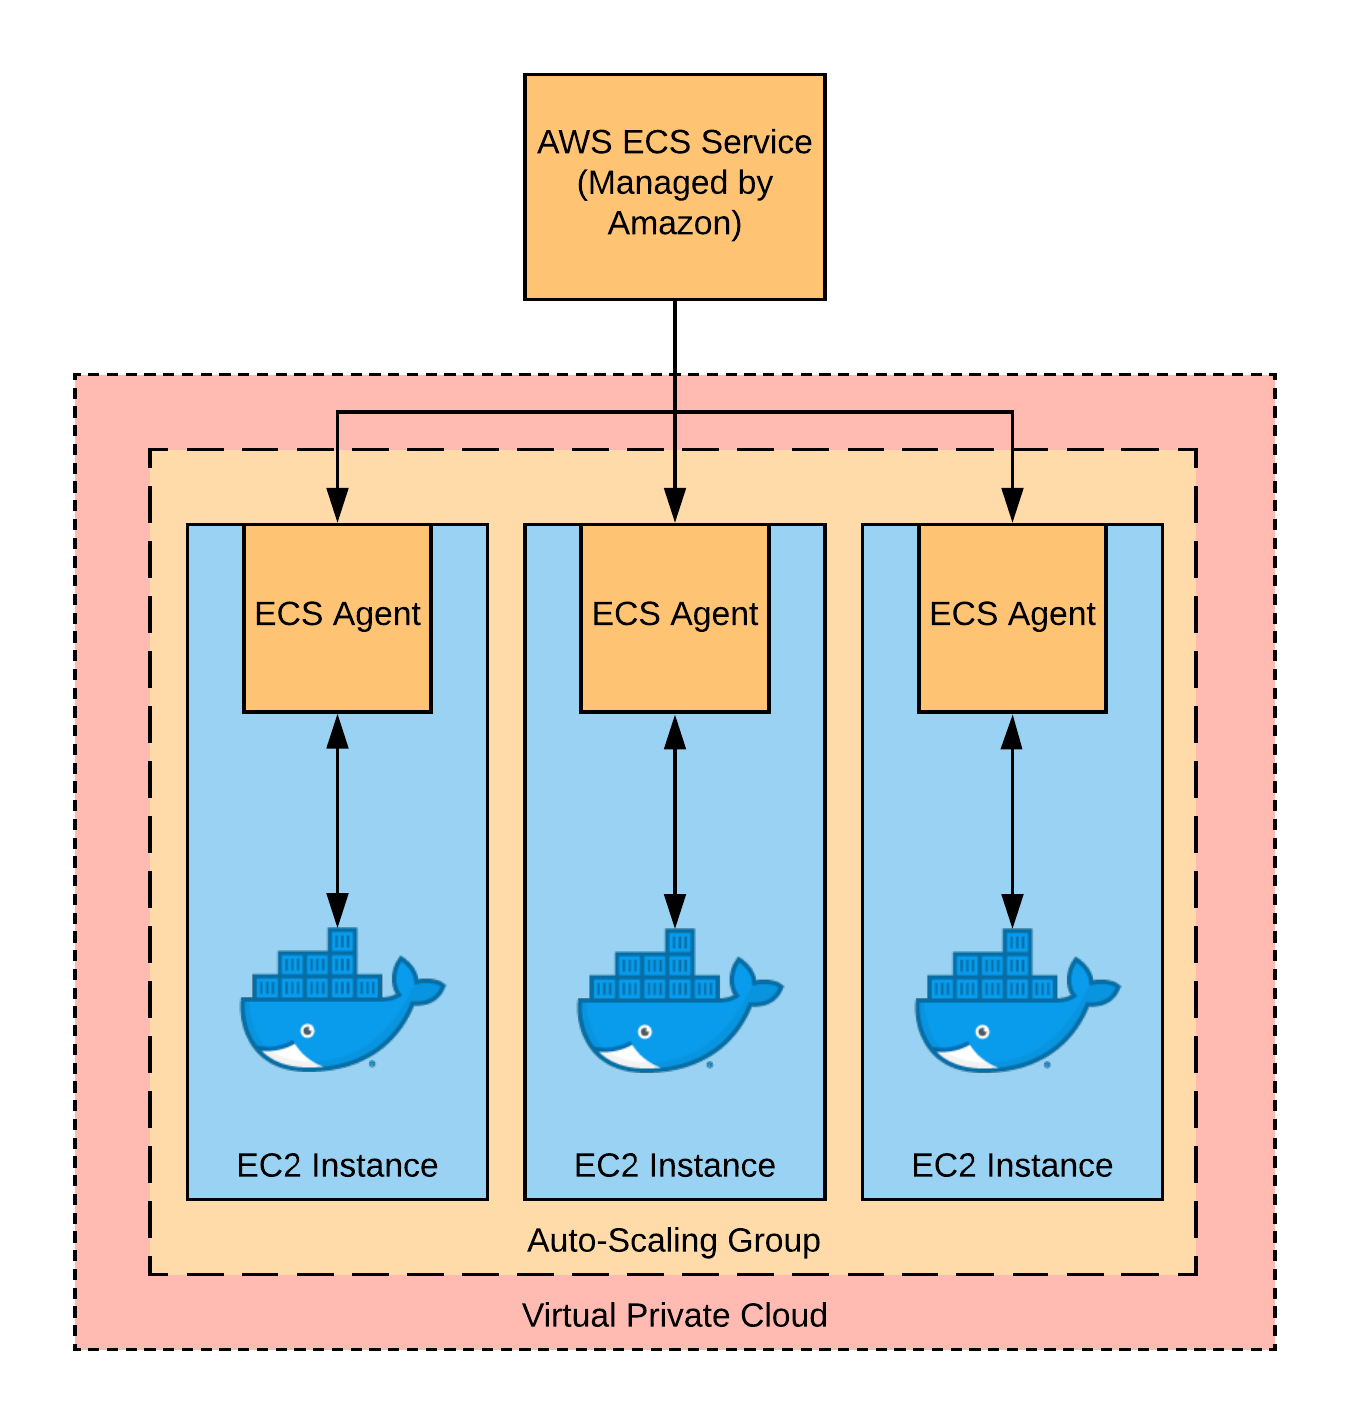
Unfortunately, Amazon hasn’t made this process of adding EC2 instances super obvious for noobs. At this point, there will be a number of steps which we can’t really validate until they all come together:
- Add an Auto-Scaling Group (“ASG”) for
megapool. - Add a Launch Configuration (a sort of template telling AWS how to initialize machines) to that ASG.
- Have that Launch Configuration use an Amazon Machine Image (“AMI”), a
sort of virtual machine image, which will contain the ECS
agent. The ECS Agent is responsible for talking to AWS’s internal
ECS APIs, and will register the EC2 instance to become a worker for
megapool. - The ECS Agent needs a few permissions that aren’t automatically given. So we’ll need to add a few Security Group rules and some Identity and Access Management (“IAM”) roles to grant those permissions. Security Group rules live within an AWS Virtual Private Cloud (“VPC”), so we’ll create one of those as well.
That’s a lot of stuff! Here’s a picture of what needs to happen:
Adding the ASG
Let’s first add an ASG which will contain all of the EC2 instances in our cluster.
resource "aws_autoscaling_group" "megapool" {
  name                 = "megapool"
  vpc_zone_identifier  = ["${module.vpc.private_subnets}"]
  launch_configuration = "${aws_launch_configration.megapool.name}"

  desired_capacity = 3
  min_size         = 3
  max_size         = 3
}
Though this won’t “compile” yet, we’ve already here defined a group of three EC2 instances that will form the pool of machines running tasks in our cluster.
The auto-scaling group just defined is referencing two things we haven’t defined yet: a VPC and a launch configuration. Let’s add those next.
Adding the VPC
Adding a VPC properly is pretty annoying. So instead, let’s just use a pre-defined one from the community:
module "vpc" {
  source = "terraform-aws-modules/vpc/aws"

  name = "vpc"
  cidr = "10.0.0.0/16"

  azs             = ["us-east-1a", "us-east-1b", "us-east-1c"]
  private_subnets = ["10.0.1.0/24", "10.0.2.0/24", "10.0.3.0/24"]
  public_subnets  = ["10.0.101.0/24", "10.0.102.0/24", "10.0.103.0/24"]

  enable_nat_gateway = true
  enable_vpn_gateway = true
}
Looking back up at the ASG we defined above, you can see that we had it use the private subnets of the cluster. That’s because there’s no reason the instances in the cluster need to have public IP addresses. If you want to make the services the cluster offers publicly addressable, add a load balancer to the public subnet, and have it call into the private one.
Adding the Launch Configuration
The other thing our ASG was missing was a launch configuration. This is where a lot of the magic happens. In particular, a launch config is where we tell AWS:
- What image (AMI) to run on the instances – in our case, we’ll use the “ECS Optimized AMI”, which AWS maintains and is meant for running the ECS Agent (more on that later).
- What permissions the instances should get, which allows us to give the instances the permissions ECS Agent requires.
- How to initialize the instance – in particular, we’ll set a configuration variable that the ECS Agent reads from to know the name of the cluster it’s supposed to join.
Here’s our launch configuration. A lot of the resources are still to be defined:
resource "aws_launch_configuration" "megapool" {
  name                 = "megapool"
  image_id             = "${data.aws_ami.ecs_optimized.id}"
  iam_instance_profile = "${aws_iam_instance_profile.ecs_agent.name}"
  security_groups      = ["${aws_security_group.allow_all.id}"]
  user_data            = "${data.template_file.user_data.rendered}"

  # You probably want to use something beefier. This is just for demo purposes.
  instance_type = "t2.micro"
}
Notice that two of the properties – image_id and user_data – are data
sources, not resources. That’s because they don’t actually correspond to AWS
resources, they’re just things we’ll compute without asking AWS to create
anything.
We don’t need to create the aws_ami because AWS has already made it for us.
In their docs, AWS has this great big table with the image ID you
should use based on the region you’re using.
We could reproduce that big table in Terraform, or we could just search for the
AMI you want using Terraform’s aws_ami data source, since the AMI always has
the same name in every region:
data "aws_ami" "ecs_optimized" {
  filter {
    name   = "name"
    values = ["amzn-ami-2017.09.l-amazon-ecs-optimized"]
  }
}
The launch config user data is basically just a script to run once the machine
boots up. On initialization, we want to set ECS_CLUSTER=megapool in
/etc/ecs/ecs.config, which will tell ECS Agent what cluster to join.
data "template_file" "user_data" {
  template = "${file("${module.path}"/user_data.yaml)}"

  vars {
    ecs_cluster = "megapool"
  }
}
You’ll need to add a file called user_data.yaml alongside your .tf file
with this in it:
#cloud-config
bootcmd:
 - cloud-init-per instance $(echo "ECS_CLUSTER=${cluster_name}" >> /etc/ecs/ecs.config)
At this point, we have everything set up! But it won’t work, because almost everything in AWS is default-deny. We still need to add security groups and IAM roles that will allow ecs agent to do its thing.
Adding the Instance Profile IAM Roles
Last step! We’re almost there. Though the EC2 instances will now have network access to the relevant ECS services, they won’t have permission to actually do anything.
Thankfully, AWS has us covered here. They’ve already defined an IAM policy that
encompasses everything the ECS Agent needs to run – it’s called
AmazonEC2ContainerServiceforEC2Role. We just need to give the EC2 service
permission to do things on our behalf, by letting ec2.amazonaws.com assume
roles in our account.
Let’s do that now:
# Define the role.
resource "aws_iam_role" "ecs_agent" {
  name               = "ecs-agent"
  assume_role_policy = "${data.aws_iam_policy_document.ecs_agent.json}"
}

# Allow EC2 service to assume this role.
data "aws_iam_policy_document" "ecs_agent" {
  statement {
    actions = ["sts:AssumeRole"]

    principals {
      type        = "Service"
      identifiers = ["ec2.amazonaws.com"]
    }
  }
}

# Give this role the permission to do ECS Agent things.
resource "aws_iam_role_policy_attachment" "ecs_agent" {
  role       = "${aws_iam_role.ecs_agent.name}"
  policy_arn = "arn:aws:iam::aws:policy/service-role/AmazonEC2ContainerServiceforEC2Role"
}
So far, all we’ve done is define a role. To actually have the launch configuration launch instances that use our role, we have to create an instance profile:
resource "aws_iam_instance_profile" "ecs_agent" {
  name = "ecs-agent"
  role = "${aws_iam_role.ecs_agent.name}"
}
Phew! And now we’re done!
Testing that this worked
Let’s make sure all of these steps actually worked. First of all, we can see that the EC2 instances really were added to the cluster:

(Note the “3 Container Instances” at the bottom right.)
Let’s try to prove we can actually run a task on this cluster. Because we’re
running on t2.micro instances, there’s not a ton we can actually do, but let’s
try doing a “hello world”:
aws ecs register-task-definition \
  --family hello_world \
  --container-definitions '[{ "name": "hello_world", "image": "ubuntu", "memory": 512, "entryPoint": ["/bin/bash", "-c", "echo hello world $(date)"], "logConfiguration": { "logDriver": "awslogs", "options": { "awslogs-group": "hello_world", "awslogs-region": "us-east-1", "awslogs-stream-prefix": "megapool-hello_world" }}}]'
That container definition is pretty long-winded, but the gist of it is that
we’re running /bin/bash -c "echo hello world $(date)" on an ubuntu image.
We’re sending the logs to CloudWatch, so we can use any cloudwatch reader to
read from them.
Let’s now invoke the definition we just created:
aws ecs run-task \
  --cluster megapool \
  --task-definition hello_world:1
And use cwlogs to see the output:
$ cwlogs fetch hello_world
[ megapool-hello_world/hello_world/3fadff02-6d81-4197-9321-06d1c910b0d2 ] 04-20 20:44:09 INFO - hello world Sat Apr 21 03:44:09 UTC 2018
Hooray! That’s a successful end-to-end test. Our Terraform code works!
Possible Improvements
This post is meant to show you the minimal amount of work you’d need to do to hit the ground running. The additional details start to really depend on what you’re trying to do, and I didn’t want to get mired in details.
If I were you, here are a few improvements I’d consider making before taking this to prod:
Security Groups
We haven’t added any security groups to our cluster instances. That means the
containers on those instances can’t talk to anything on the network. This wasn’t
an issue for our hello_world container, but you probably want to allow HTTP
ingress and egress, as well as SSH traffic to/from your bastion instances.
Actual auto-scaling
Right now our “auto-scaling group” in fact doesn’t scale at all. It will always stay fixed at three instances. You may want to add CPU- and memory-based scaling policies.
Bastion Servers
I mentioned this in the “Security Groups” improvement, but I’ll elaborate here. As defined in this post, there’s no way to SSH into the cluster instances. That’s not ideal, and makes debugging stuff much harder. The solution to this is to add a bastion server, which exists only to bestow SSH access to other services.
The long-and-short of how you’d add a bastion is that you’d designate one of your public subnets as a “bastion” subnet, containing instances that aren’t running any code (instances in this subnet are publicly addressable, so you want to make sure to limit your exposure). Then, with security groups allow SSH access from the bastion subnet to any of your private subnets. Grant a corresponding rule for your cluster instances that allows incoming traffic from the bastion subnet.
Finally, on both your bastion and cluster instances, add a public key of your choosing for access. Then, you can use SSH forwarding to connect to container instances from your personal computer via the bastions.
Copy-Pasteable Code
Here’s all the code mentioned above, concatenated into a single file:
If you’re just here to copy working code, the code below will work. But you might want to consider the “Possible Improvements” above.
module "vpc" {
  source = "terraform-aws-modules/vpc/aws"

  name = "my-vpc"
  cidr = "10.0.0.0/16"

  azs             = ["us-east-1a", "us-east-1b", "us-east-1c"]
  private_subnets = ["10.0.1.0/24", "10.0.2.0/24", "10.0.3.0/24"]
  public_subnets  = ["10.0.101.0/24", "10.0.102.0/24", "10.0.103.0/24"]

  enable_nat_gateway = true
  enable_vpn_gateway = true
}

resource "aws_ecs_cluster" "cluster" {
  name = "megapool"
}

resource "aws_autoscaling_group" "cluster" {
  name                 = "megapool"
  vpc_zone_identifier  = ["${module.vpc.private_subnets}"]
  launch_configuration = "${aws_launch_configuration.cluster.name}"

  desired_capacity = 3
  min_size         = 3
  max_size         = 3
}

resource "aws_launch_configuration" "cluster" {
  name                 = "megapool"
  image_id             = "${data.aws_ami.ecs_optimized.id}"
  iam_instance_profile = "${aws_iam_instance_profile.ecs_agent.name}"
  user_data            = "${data.template_file.user_data.rendered}"
  instance_type        = "t2.micro"
}

data "aws_ami" "ecs_optimized" {
  filter {
    name   = "name"
    values = ["amzn-ami-2017.09.l-amazon-ecs-optimized"]
  }
}

data "template_file" "user_data" {
  template = "${file("${path.module}/user_data.yaml")}"

  vars {
    ecs_cluster = "megapool"
  }
}

# Define the role.
resource "aws_iam_role" "ecs_agent" {
  name               = "ecs-agent"
  assume_role_policy = "${data.aws_iam_policy_document.ecs_agent.json}"
}

# Allow EC2 service to assume this role.
data "aws_iam_policy_document" "ecs_agent" {
  statement {
    actions = ["sts:AssumeRole"]

    principals {
      type        = "Service"
      identifiers = ["ec2.amazonaws.com"]
    }
  }
}

# Give this role the permission to do ECS Agent things.
resource "aws_iam_role_policy_attachment" "ecs_agent" {
  role       = "${aws_iam_role.ecs_agent.name}"
  policy_arn = "arn:aws:iam::aws:policy/service-role/AmazonEC2ContainerServiceforEC2Role"
}

resource "aws_iam_instance_profile" "ecs_agent" {
  name = "ecs-agent"
  role = "${aws_iam_role.ecs_agent.name}"
}
You also need to add user_data.yaml alongside the *.tf file:
#cloud-config
bootcmd:
 - cloud-init-per instance $(echo "ECS_CLUSTER=${cluster_name}" >> /etc/ecs/ecs.config)